Friday, March 24, 2017

Week 36: Final Projects + Getting Ready for Baby

It's so odd to think this is my last pregnant blog post. The next time I update, I will have a second child. Here are my comparison pictures. E on this left; this pregnancy on the right.


We managed to squeak in some family photos yesterday. I am so glad we got to capture our last days as a family of three. It almost didn't happen as baby girl failed her NST badly. I had an appointment at 0900 on Thursday for an NST and a biophysical profile. We ended up not leaving labor and delivery until 1515.

My OB and midwife are concerned that my placenta is crapping out on me. My amniotic fluid levels dropped a ton and baby girl's heart rate started decelerating with every contraction. I spent five hours on the fetal monitor. Once they repositioned me completely on my side, she started doing much better. They let me go home and we managed to get our family pictures taken. I am so grateful that Jackie Jane Studios was able to help us out last second. I reached out to one of my photographer friends from back home and she put us in touch, so thank you very much to Alex too!

DIY Home is Where the USMC Sends Us Plaque

One of my mom friends shared this idea on Facebook, so I had to take a crack at it. It's not done yet, but the hard parts are complete. I'm going to put a picture of each state we've been stationed in as well as interlocked rings for where we got married and little baby feet for the places I gave birth, I'm also going to include the dates we lived there. 


To make the EGA, I bought a stencil sheet and Exacto knife. I found a stencil online and traced it, then I cut it out. This gave me one giant red EGA. I wanted some definition for the ropes that wrap around the anchor. I also wanted to include North and South America. To do that, I took the piece I cut out initially for the main stencil then cut out holes for the parts that appear in white. I lined it up and laid it over the red once it was dry and filled it in.

To make the handwritten part, I bought some charcoal tracing paper and an ink pen. I found a font I liked online, adjusted it to the size I needed, and traced it onto regular paper. If my printer had ink, I would've just printed it. But alas, no ink, so I traced it. Then I laid the charcoal paper on the white board and put my traced letters on top of it. Then I traced over that once more to transfer it to the white board. After that, I filled in the tracing with a black paint pen.


Tuesday, March 21, 2017

DIY Hanging Mason Jars Instructions

I provided some details on how I made the hanging mason jar projects, but I've been asked for more details. The whole reason I made this particular project was because E grew and can reach into the junk drawers now. She kept coloring the tablecloth, walls, etc. I needed somewhere else for the pens and markers to go, but I didn't want them sitting out on my counters or put away in the closet/some other inconvenient location.

The other hanging mason jar crafts (here and here) were for decoration, so I coated the inside of those with paint. I opted not to do that for this project because I never know what color the walls will be in our next kitchen when we move and I didn't want the pens to scratch through the paint.

What You Will Need


  • A wood board (I got mine at Michaels, it came with a string for hanging it already attached)
  • Mason jars
  • Worm gear clamps/hose clamps
  • 1/2 inch tube straps
  • Wood screws (length will depend on the thickness of the wood board)
  • Screwdriver


I measured out how wide the board was and eyeballed where I wanted my mason jars to start and end. I also estimated how much mason jar I wanted to extend past the bottom of the board/how much of the pens/pencils I wanted to extend past the top. Then I measured out the area in between so they would be evenly spaced.

I screwed the top part of the tube straps down and slipped the worm gear clamps under the non-attached side. Then I screwed the bottom half of the tube straps into place.


I removed the center portion of the mason jar lids so the inside is easily accessible. Then I stood the board upright and slipped the worm gear clamps over the tops of the mason jars and tightened them into place. I made sure to turn the clamp fastener toward the back so they weren't so visible.


Then I put our copious amount of markers, sharpies, pens, and pencils into the jars.


Look how clean and organized my junk drawers are now!


Friday, March 17, 2017

Pregnancy Week 35: Cholestasis of Pregnancy

Here are my 35-week comparison pictures. The images with the white headband are with E's pregnancy. My brain is a little frazzled this week, so I swapped sides in each side-by-side on accident.


It would seem I need to keep my big mouth shut. Preterm labor reared its ugly head again. I felt off again over the weekend. On Monday, I started losing chunks of cervical mucus (most likely plug). Some of them had the slightest amount of blood. It was so minimal, I figured I would mention it at my OB appointment scheduled for the next morning.

I went in on Tuesday and my OB decided she would check me just to make sure nothing was going on. Before, I was 1.5-2cm dilated depending on who checked me. My OB felt I was 1.5cm. At this appointment, she noted I had dilated to 3cm. She decided to have me do a non-stress test (NST), and I failed it spectacularly. No sense in half-assing it, I guess.

Here is my print out. The top row is baby's heart rate. It should be in the blue. It obviously did not stay in the blue. The bottom row is my contractions. They were coming every 2-3 minutes, but they weren't particularly strong.


My OB sent me down to L&D for some monitoring. By the time I waddled on down there, I dilated to 4cm. Despite continuing contractions, my cervix held at 4cm for the remainder of my observation, so they let me go home. They noted I am 80% effaced and baby girl is still at -2 station.

Before going to L&D, my doctor had the nurses draw some blood. At my last visit, I complained of mild itching in seemingly random place: my feet, my wrists, and my jaw. The itching wasn't waking me up or excessive, so we decided to just keep an eye on it. A few days after that, the itching increased dramatically. I was drawing blood in my sleep, so I called again between my appointments to ask the nurse if this level of itching is normal. She gave me a few things I could try to relieve the itching, but nothing worked. I continued to complain about it at my Tuesday appointment, thus the blood test.

My OB called me on Wednesday with the test results. I have something called cholestasis of pregnancy. It's a condition where my liver stops processing bile acid. It happens in about 1 and 1000 pregnancies. The bile levels rise, causing the itching. However, it crosses the placenta and causes fetal distress. It also causes stillbirths.

I think my heart fell out of my chest when I got that call. Because of all the preterm labor issues I've been having, I received the steroid shots to rapidly develop baby girl's lungs at 30 weeks. I will receive another dose in the next week. I will be induced shortly after that. We are not sharing the induction date with the public at large. I have yet to wrap my brain around this.

Wednesday and Thursday I was in shock. Today, I am angry. I am angry that my labor experience will be nothing like I wanted. I am angry at my body for its incompetence when it comes to pregnancy. I am angry that I cannot do the one thing my body was most definitely designed to do. I cannot carry this child to term. I cannot protect her. My body is trying its level best to hurt her.

Today, I am allowing myself to be angry. If I don't, it will bottle up and explode and I do not have time for that.

Sunday, March 12, 2017

Pregnancy Week 34: DIY Reupholstered Glider + Mounted Painted Mason Jars + Washi Tape Phone Case Makeover

Everything has been fairly quiet in pregnancy land. I go in for another prenatal appointment on Tuesday so I may have some more updates then. For now, everything is going smoothly! At 34 weeks, most babies are 19-22 inches long and weigh around 4.9 pounds. They estimated baby girl to be 4.5 pounds at 32 weeks, so 4.9 seems about right. She is about the size of a pineapple, and boy howdy do I believe it. My right ribs feel like they're going to bust.

With E's pregnancy, I had my baby shower around this time. We played a game where everyone cut a piece of yarn that they guessed was how big around I was at my widest point. Whoever was the closest won. The winner was smack on with my belly. I found the string in an old purse during one of my many nesting/cleaning episodes. I am slightly smaller this time around. Here are the comparison pictures. E on the left; this pregnancy on the right. My belly was much rounder and cute looking with E.


DIY Projects

I have the craft bug. I have it bad. I finished reupholstering the glider this week. I found a used one I liked for $30. I liked the glider itself anyway; the fabric had to go and the cushions needed adjusting because the top sloped funny. I ended up buying $30 in new fabric to reupholster it. I got too much (surprise), but I would rather have too much than not enough. Plus, $60 for a glider is a heck of a deal since most of them cost more than twice that amount.

This glider was a little more complicated to reupholster than the one I did for E's room. This glider had a base cushion with multiple pieces of fabric rather than one solid piece. I am way too lazy for that nonsense. So I got my seam ripper and tore that fabric off completely. That left me with one piece of foam.

I took the seam ripper to the top piece as well because it had a thick cord all the way around that I did not like. I was going to undo the seams holding together the individual pieces on the top, but that turned out to be way more cumbersome than expected. So I left it intact and just made a slip cover for it instead. I removed the velcro pieces that attach the cushions to the back of the glider and sewed them onto my new fabric once I was done. Here is the before and after.

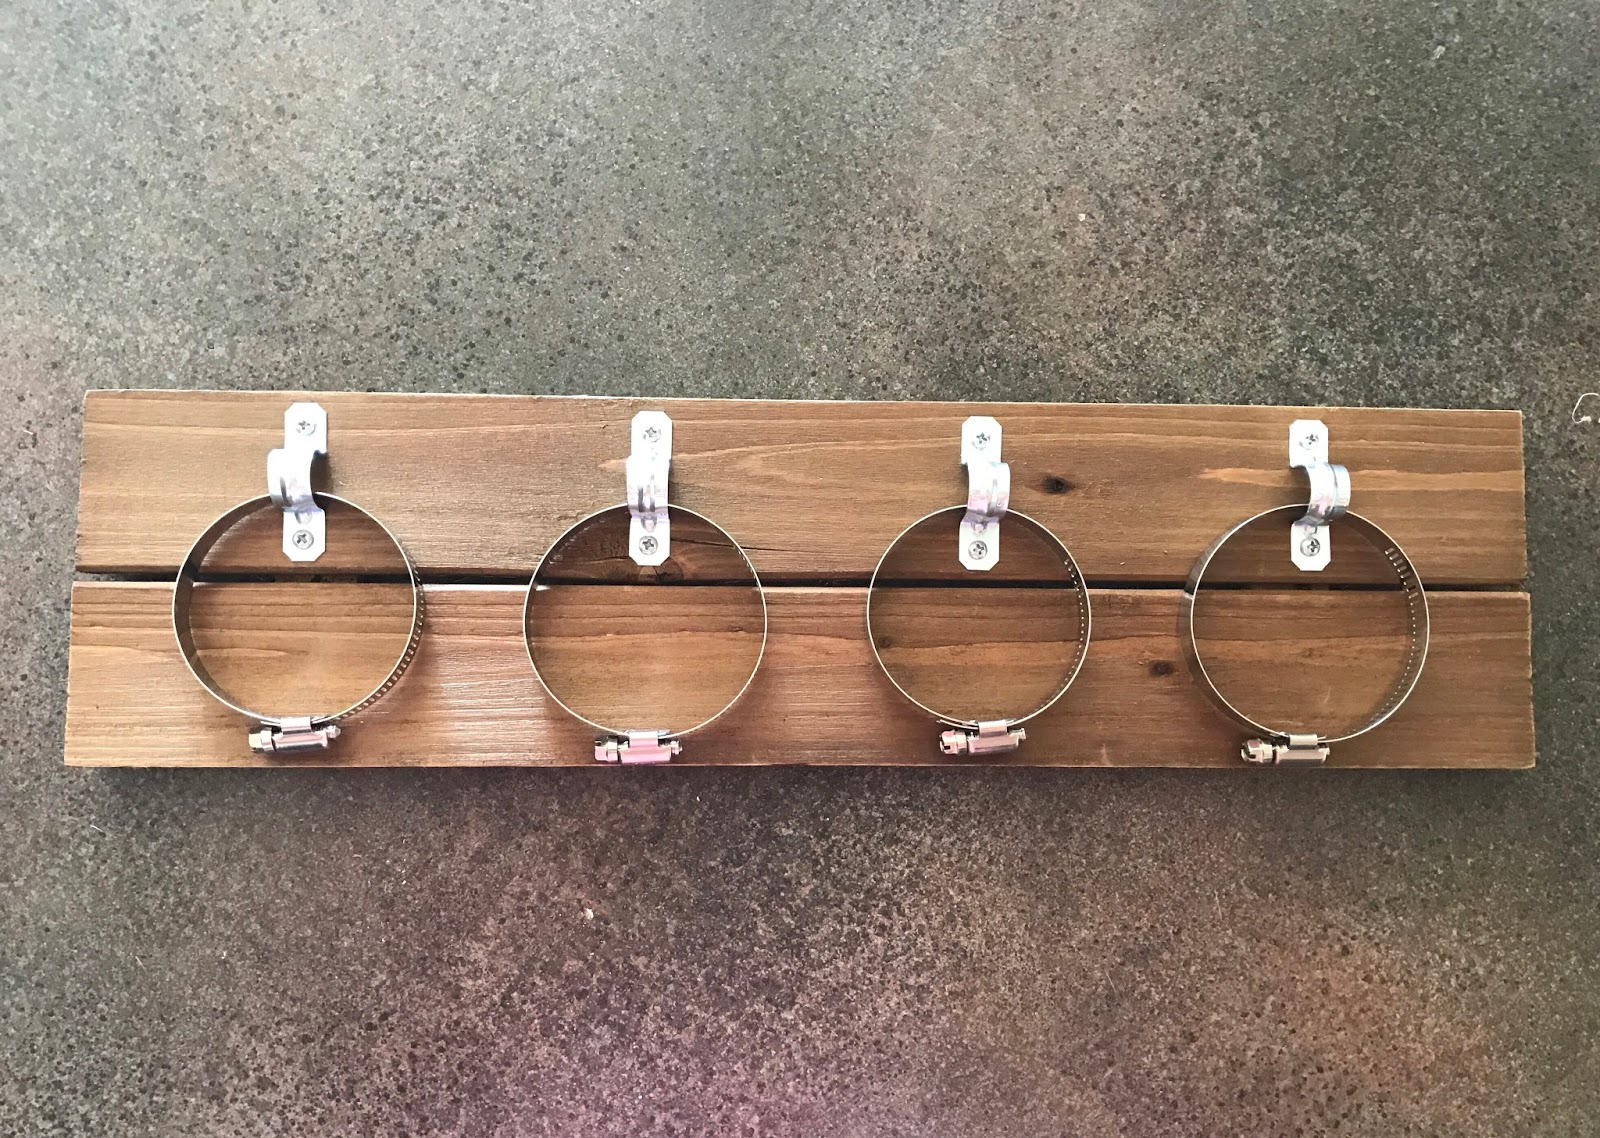
I also made some changes to the hanging painted mason jars. I decided I didn't like them hanging from the ceiling. I already have two mobiles (one over the crib and one over the changing table), so it felt like too much. The jars also wouldn't stay facing the direction I wanted, so I decided to mount them instead.

I got a piece of wood from Michaels for dirt cheap ($3.60 after using the 40% off coupon they always have on their website). I also got some tube straps, screws, and worm clamps from Lowes. That was about $5. I eyeballed where I wanted the jars to go, then measured it to make sure I spaced the jars evenly. I placed the worm clamp inside the tube straps and screwed them into place. Then I adjusted the worm clamps until they were tight around the mason jars. I hid the actual clamp part near the back since it's the prettiest looking.

The piece of wood came with twine attached to the back already, so it was easy to hang up on the wall. This is a pretty versatile project. Instead of flowers/decor, you can use it in the bathroom to hold makeup/supplies or in an office to hold pens, pencils, etc. It would also be cute for a craft room to hold paint brushes, knitting needles, and so on.


My last small craft was more for functionality than anything else. Hubs and I both got new phones recently. Our cases are identical and he kept accidentally taking my phone. I tried a few DIYs to distinguish the cases from one and other, but I never cared much for the outcome. Then I discovered washi tape. Or, more accurately, mylar tape. Washi tape with scuff and fade with time since the design is on the outside.

The mylar tape I have is metallic and the color portion is on the inside of the tape. Since I wrapped it all the way around the case to hide the edges behind the phone, it is easy to tell our cases apart from the back as well as the front. Here is the final result.


Monday, March 6, 2017

Pregnancy Weeks 32 + 33: So Much Nesting

My uterus has finally calmed down! My last OB appointment was uneventful and my cervix is holding steady. The baby was measuring really small, but I was pretty sure that was because she dropped lower. My OB ordered an ultrasound as a precaution. Baby girl is measuring spot on with my due date and her fluid levels look good. As expected, she's just really far down. The ultrasound tech wanted to grab a picture of her face for me, but baby girl was too low for her to be able to see her face. So now I am back to biweekly appointments instead of weekly. Hooray for normalcy! Here are my comparison pictures for 32 and 33 weeks.

32 weeks with E on the left; 32 weeks with this pregnancy on the right.


33 weeks with E on the left; 33 weeks with this pregnancy on the right.


Nesting

I have a crafting problem. I've made two mobiles, decorated a picture frame with gems, hung painted mason jars with flowers, and made another piece of wall art using mason jars for E's room. I also made block letters for the nursery, but I won't be sharing those until after I give birth.My crafts are spilling over into other parts of the house now (like E's room). I just want to organize, decorate, and clean everything.

Below is what I used to make the second mobile as well as a picture of the finished project (inspired yet again by my friend's mobile). I cut the flower bunches into individual stems so I could hang them with floral stem wires. I wrapped the uppermost part of the stems of the purple and white flowers and attached them on the inner most ring of the green wire. On the middle ring, I alternated between the smaller purple and white flowers. I also arranged them at varying heights. On the outermost ring, I attached the white flowers on ribbon.

I attached thin white ribbon to the center of each perpendicular bar to be able to hang the mobile. To hide the green and white wires, I wrapped the entire wire wreath with purple and white ribbon. I took care to not shift the stems so they stayed spaced how I wanted them. Then I used my glue gun to glue remanents of the small purple and white flowers to the top of the mobile.


Here is the first painted mason jar craft I did as well as the finished product.


I poured some paint into the jar and start spinning it to coat the inside. I added more paint as necessary. Then I placed them on some paper upside down to allow any excess paint to drain. I propped them up slightly to allow air in so they could dry overnight.

I took the top out of the mason jar and put the lid back on then I arranged the flowers how I wanted. I wrapped and tied the neck in twine, then hung them from the ceiling at varying heights.

Here is the second painted mason jar project.


I coated the inside of the jars in paint using the same method I described above. The wooden frame had hanging hardware so that it would hang like a portrait. I unscrewed it and reattached it so I could hang it like a landscape. Then I measured out where the center was above each empty square and put in a nail. Much like the first mason jar project, I arranged the flowers how I wanted them, wrapped and tied twine around the neck of the jar, and then hung them from the nails. I had to adjust this a few times to get them to hang how I wanted.

Michaels really needs to stop having sales and sending me coupons. I can't help myself.